Create your first helloworld application with Alexa's skills
Welcome to this first tutorial dedicated to the development of Amazon Alexa skills. Today we will see how to make an alexa application that says "Hello World" when invoked on an Amazon echo, on your phone application or on your connected watch.
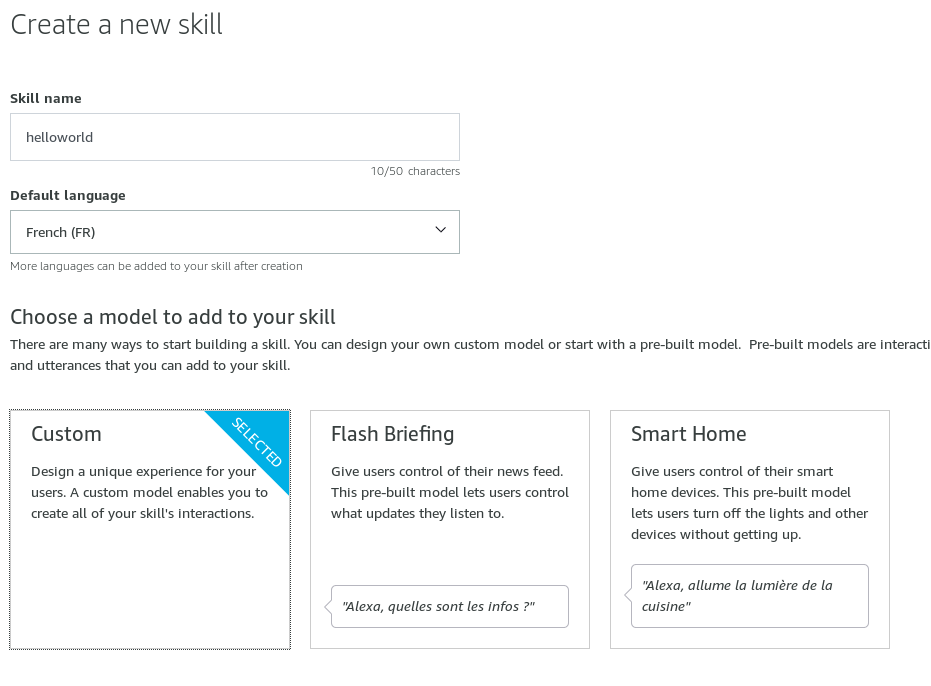
Click on "Create Skill" and enter the name of your Skill. Today we will choose to create a "Custom" Skill:

In the header you have 5 links:
- Build: this is where you will configure your application and implement speech "recognition".
- Test: this is where you will go to test your application. Warning: currently on the development console "test" only works in the main language...do not try to make it recognize French if your main language is English, it will not succeed.
- Distribution: this is where you will describe your skill to appear in the amazon store app.
- Certification: In order to publish an application you must have it certified, i.e. pass certain validation steps, all this will be found here.
- Analytics: here are the statistics on the use and downloading of your skills.

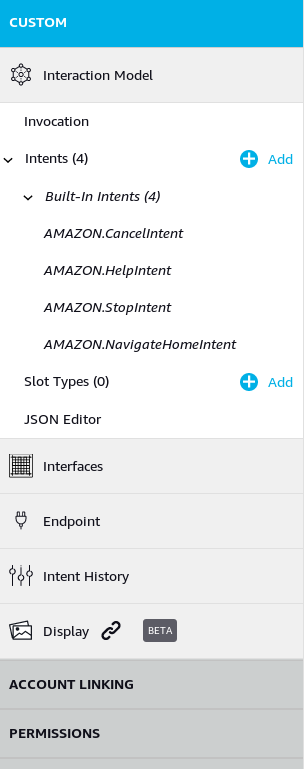
On the left border you have several tabs:
- Custom: it's your dashboard, the "Skill builder checklist" allows you to know where you stand with your Skill so you can publish it.
- Invocation: this is where you will define the keyword(s) that will be identified by Alexa to "invoke" your application, i.e. for Alexa to recognize that the command that will follow must be interpreted via your Skill.
- Intents: "intentions", this is where you can define alexa's logic for speech recognition that will allow it to interpret certain words to perform certain actions.
my article on how to create a chatbot it's a bit the same principle.
- Slot types: this is where you will define your "variables", it is often very useful otherwise Alexa has trouble understanding what you will mean, we will see why in the next lessons. we will not need it for the hello world.
- JSON Editor: this allows you to edit the configuration of your Skill directly as a JSON. When you master well it's faster.
- Interfaces: Allows you to activate other Intents that will allow you to play audio files, display an interface (for "Echo Show" devices for example) or control an Alexa Gadget that you have created yourself if you master electronics.
- Endpoints: allows you to define an endpoint, i.e. the url of the webservice on which Alexa will send the request she understood via voice recognition.
- Intent History: will allow you to see what users are asking your application for...great practice to enrich it later.
- Display: allows you to choose a skin for displaying your messages.

Be careful, it must be written in lowercase.
By doing this you tell Alexa that when you say "Alexa, ask HelloWorld for something", Alexa must send the chain "something" to your HelloWorld skill to be analyzed.
So go to "Intents" in the left menu and create a "custom intent" called "HelloIntent".
You must now create "Utterances" of which it is composed, so add 3 Utterances:
- "Hello"
- "Hi"
- "Yop"
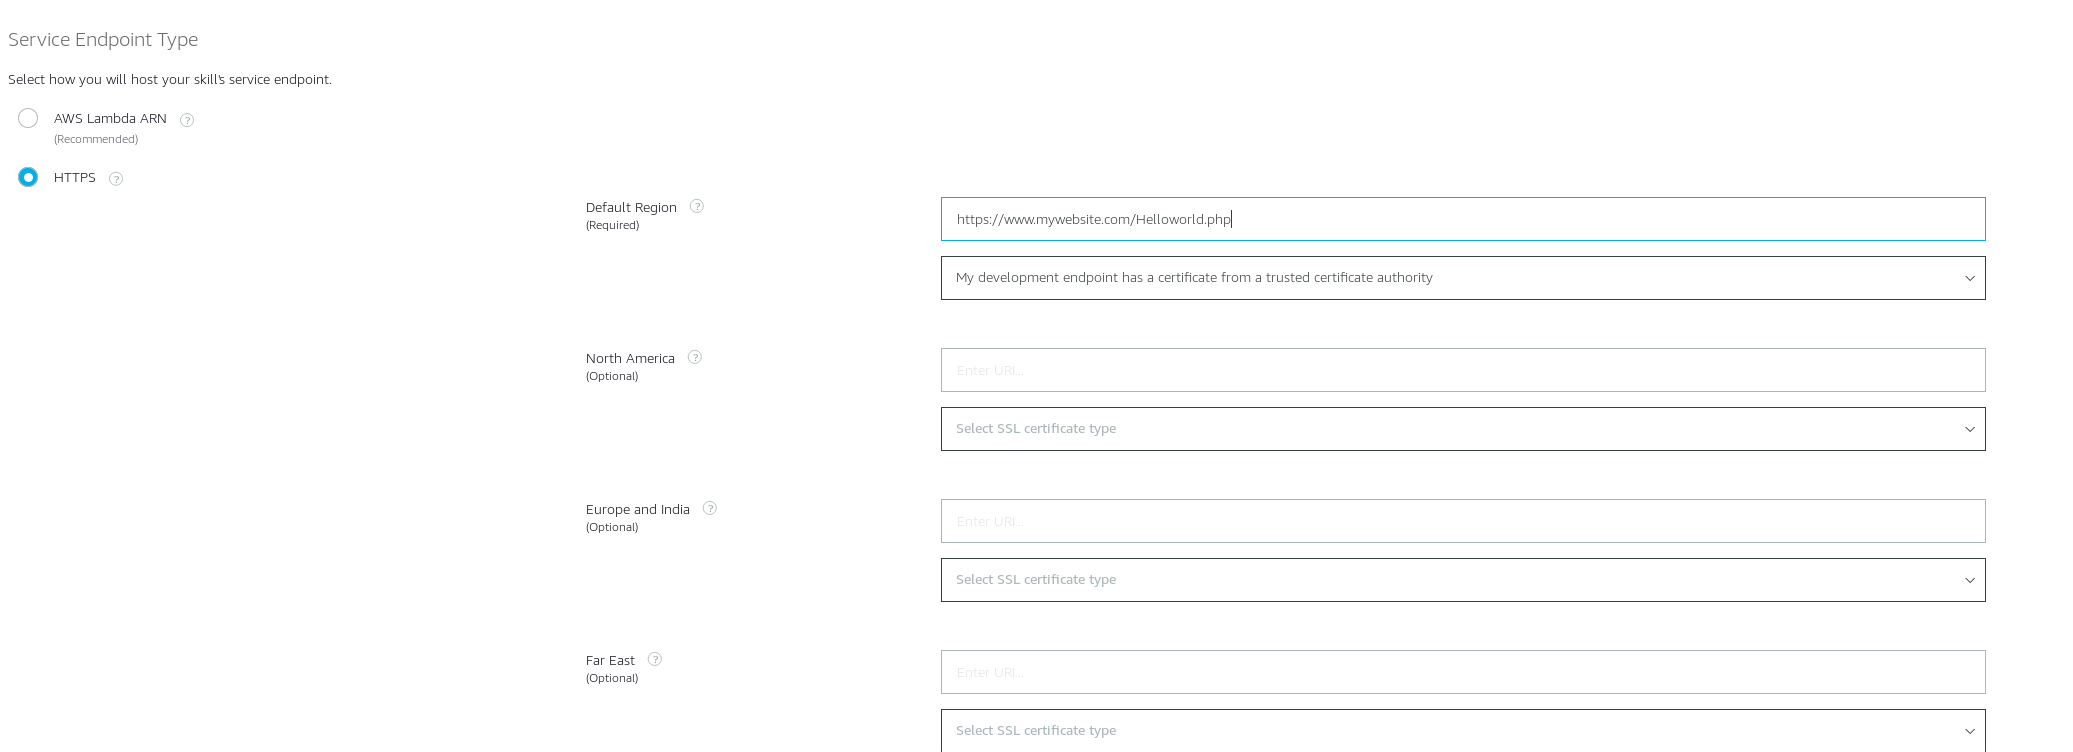
- Insert the url of your PHP file (example: https://www.votresite.com/helloworld.php) which will read Alexa's request and send her an answer.
- Select "my development endpoint has a certificate from a trusted authority".
You must have a web server accessible by Amazon in HTTPS to be able to define an endpoint URL, i.e. a URL that Alexa will consult to get an answer.
Alexa will then send as a parameter of her query a data table that will allow you to know which Intent has been recognized.

Alexa will then send a request in the form of JSON which will look like this:
We see that:
- "requests to helloworld": will allow alexa to recognize that we are invoking your helloworld skill here since it is your webservice that received the request.
- "hi": will be recognized as the "HelloIntent" intent (as you can see in the json in "request/intent/name").
- "requests to helloworld": will allow alexa to recognize that we are invoking your helloworld skill here since it is your webservice that received the request.
- "hi": will be recognized as the "HelloIntent" intent (as you can see in the json in "request/intent/name").
Alexa is waiting for her as an answer, a JSON that we will return in this form:
There you go!

You have created your first Skills Alexa, this "Hello World" is not publishable on the platform as it is because it is just a first test to make you understand the global functioning. We will complete this skill in the next tutorials to add additional functions and you will also see how to publish a skill on the amazon awning. I hope this tutorial has more for you, if so, you help me to make other tutorials by taking a premium account on the site. Thank you for your attention and we will see you in the next developer tutorial for amazon Alexa.
How does an Alexa skill work?
First of all, you should know that Alexa is an application that is located in the Amazon Cloud. It is available on the Apple App Store, Google Play and the Amazon App Store. Amazon echo devices make it popular today, it allows you to control your home automation devices to make your home smart, connect your amazon echo speaker with your spotify music application or even have the weather on your alarm clock with your little flash news and your spotify playlist played directly while you take your shower. In short Alexa is connected with a lot of things and each connection / new feature of alexa is called a "skill". Today if you are on this tutorial, it is because as I would like to know more about skills development, I will share with you my experience through these tutorials. The Skills that you decide to activate on your Alexa account are in the "Amazon cloud", it should be known that the code runs in it, nothing is done directly on the user's device. The application we are going to create today will be an app in the cloud.Create my first skill Alexa
To create it, you must first create an account Amazon Developer, then go to the Alexa Developer Console.Click on "Create Skill" and enter the name of your Skill. Today we will choose to create a "Custom" Skill:

Alexa's developer console
You are now in front of the developer console, it may seem like there are a lot of buttons and things to know but don't worry we'll see everything together, there's nothing really complicated. Let's take a look at what you're currently seeing:In the header you have 5 links:
- Build: this is where you will configure your application and implement speech "recognition".
- Test: this is where you will go to test your application. Warning: currently on the development console "test" only works in the main language...do not try to make it recognize French if your main language is English, it will not succeed.
- Distribution: this is where you will describe your skill to appear in the amazon store app.
- Certification: In order to publish an application you must have it certified, i.e. pass certain validation steps, all this will be found here.
- Analytics: here are the statistics on the use and downloading of your skills.

On the left border you have several tabs:
- Custom: it's your dashboard, the "Skill builder checklist" allows you to know where you stand with your Skill so you can publish it.
- Invocation: this is where you will define the keyword(s) that will be identified by Alexa to "invoke" your application, i.e. for Alexa to recognize that the command that will follow must be interpreted via your Skill.
- Intents: "intentions", this is where you can define alexa's logic for speech recognition that will allow it to interpret certain words to perform certain actions.
- Slot types: this is where you will define your "variables", it is often very useful otherwise Alexa has trouble understanding what you will mean, we will see why in the next lessons. we will not need it for the hello world.
- JSON Editor: this allows you to edit the configuration of your Skill directly as a JSON. When you master well it's faster.
- Interfaces: Allows you to activate other Intents that will allow you to play audio files, display an interface (for "Echo Show" devices for example) or control an Alexa Gadget that you have created yourself if you master electronics.
- Endpoints: allows you to define an endpoint, i.e. the url of the webservice on which Alexa will send the request she understood via voice recognition.
- Intent History: will allow you to see what users are asking your application for...great practice to enrich it later.
- Display: allows you to choose a skin for displaying your messages.

Configure our Skill on the console
Step 1 - Configuring the invocation
So go to the "Invocation" tab and configure the invocation name by putting "helloworld".Be careful, it must be written in lowercase.
By doing this you tell Alexa that when you say "Alexa, ask HelloWorld for something", Alexa must send the chain "something" to your HelloWorld skill to be analyzed.
Step 2 - Create an intent with the associated utterances
An Intent allows you to analyze a sentence and define what you should do with it. It is composed of one or more "Utterances" ("expressions" in French) which can itself contain variables called "Slot" (we will see later in this tutorial what they are used for).So go to "Intents" in the left menu and create a "custom intent" called "HelloIntent".
You must now create "Utterances" of which it is composed, so add 3 Utterances:
- "Hello"
- "Hi"
- "Yop"
Step 3 - Define an endpoint
Go to Endpoint and select "HTTPS", then in the default region:- Insert the url of your PHP file (example: https://www.votresite.com/helloworld.php) which will read Alexa's request and send her an answer.
- Select "my development endpoint has a certificate from a trusted authority".
You must have a web server accessible by Amazon in HTTPS to be able to define an endpoint URL, i.e. a URL that Alexa will consult to get an answer.
Alexa will then send as a parameter of her query a data table that will allow you to know which Intent has been recognized.

Step 3 - Build your model
Return to the "Invocation" tab and click on "build Model" at the top. Wait for the notification that confirms that the build has gone well and then switch to the "test" tab.Alexa's request
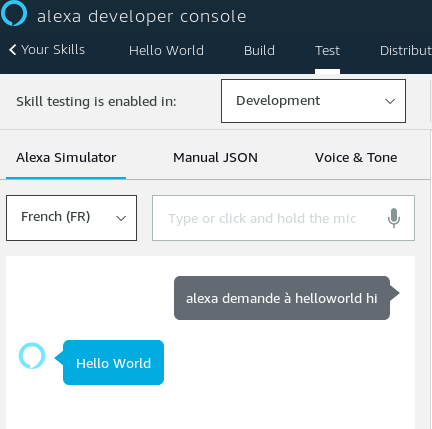
So you're going to call your Hello world and say to Alexa "alexa ask helloworld hi".Alexa will then send a request in the form of JSON which will look like this:
{
	"version": "1.0",
	"session": {
		"new": true,
		"sessionId": "amzn1.echo-api.session.XXX",
		"application": {
			"applicationId": "amzn1.ask.skill.XXX"
		},
		"user": {
			"userId": "amzn1.ask.account.XXXXX"
		}
	},
	"context": {
		"System": {
			"application": {
				"applicationId": "amzn1.ask.skill.XXX"
			},
			"user": {
				"userId": "amzn1.ask.account.XXXX"
			},
			"device": {
				"deviceId": "amzn1.ask.device.XXXX",
				"supportedInterfaces": {}
			},
			"apiEndpoint": "https://api.eu.amazonalexa.com",
			"apiAccessToken": "XXXX"
		},
		"Viewport": {
			"experiences": [
				{
					"arcMinuteWidth": 246,
					"arcMinuteHeight": 144,
					"canRotate": false,
					"canResize": false
				}
			],
			"shape": "RECTANGLE",
			"pixelWidth": 1024,
			"pixelHeight": 600,
			"dpi": 160,
			"currentPixelWidth": 1024,
			"currentPixelHeight": 600,
			"touch." [
				"SINGLE"
			]
		}
	},
	"request": {
		"type": "IntentRequest",
		"requestId": "amzn1.echo-api.request.XXX",
		"timestamp": "2019-01-03-03T23:51:35Z",
		"local": "fr-FR",
		"intent": {
			"name": "HelloIntent",
			"confirmationStatus": "NONE"
		}
	}
}
We see that:
- "requests to helloworld": will allow alexa to recognize that we are invoking your helloworld skill here since it is your webservice that received the request.
- "hi": will be recognized as the "HelloIntent" intent (as you can see in the json in "request/intent/name").
- "requests to helloworld": will allow alexa to recognize that we are invoking your helloworld skill here since it is your webservice that received the request.
- "hi": will be recognized as the "HelloIntent" intent (as you can see in the json in "request/intent/name").
Alexa is waiting for her as an answer, a JSON that we will return in this form:
{
	"version": "0.1",
	"sessionAttributes":{
		"countActionList":{
			"read":true,
			"category":true
		}
	},
	"response":{
		"outputSpeech":{
			"type": "PlainText",
			"text": "Hello World"
	}},
	"shouldEndSession":false
}
      $response = array(
          "outputSpeech" => array(
              "type" => "PlainText",
              "text" => "Hello World"
          )
      );

      $data = array(
              "version" => "0.1",
              "sessionAttributes" => array(
                  "countActionList" => array(
                      "Read" => true,
                      "category" => true
                  )
              ) ,
              "response" => $response,
              "shouldEndSession" => false
      );
      echo json_encode($data);
      die();
There you go!

You have created your first Skills Alexa, this "Hello World" is not publishable on the platform as it is because it is just a first test to make you understand the global functioning. We will complete this skill in the next tutorials to add additional functions and you will also see how to publish a skill on the amazon awning. I hope this tutorial has more for you, if so, you help me to make other tutorials by taking a premium account on the site. Thank you for your attention and we will see you in the next developer tutorial for amazon Alexa.
Questions about this lesson
You must be logged in to ask for help on a lesson.
No questions for this lesson. Be the first !